Figuring out how to put hair onto your characters can feel like a really big puzzle, can't it? Lots of people have asked about this very thing, wondering how to get those strands just right on paper or screen. It's a common spot where artists, especially those just starting out, might feel a bit stuck. The good news is that there are some helpful approaches that can make this part of your art much less of a head-scratcher, honestly.
You see, hair, whether it's flowing long or cut quite short, curly or straight, has its own particular way of sitting and moving. It’s not just about drawing individual lines; it’s about seeing the overall form and how light plays across it. This article is here to walk you through some straightforward ways to think about hair, giving you more assurance and ease when you're working on your pictures. We'll look at how hair builds up, how it feels, and even how to show different kinds of hair, like those with a lot of bounce or those that lie quite flat, in a way that feels natural.
This whole guide is put together with you in mind, offering step-by-step pointers that can help you get a better handle on drawing hair, no matter if you're sketching with a pencil or working on a digital canvas. We'll go over things like giving hair fullness, showing its feel, and even how to make those tricky curly bits appear just right. So, if you've been wanting to draw hair that truly looks like it belongs on your characters, this is a good place to begin, very much so.
- Lil Timmy Biography
- Jason Scott Lee Bruce Lee Son
- Where Is Zoe Mclellan
- How Much Money Does Bill Gates Make A Second
- Marton Csokas Partner
Table of Contents
- What Makes Hair So Tricky to Draw?
- How Can You Make Hair Look Real?
- Are There Simple Ways to Draw Different Hair Types?
- How Do I Practice Drawing Hair?
What Makes Hair So Tricky to Draw?
Many artists find that hair can be one of the more puzzling things to put down on paper. It has a way of seeming simple at first glance, but then, when you try to capture it, it becomes quite a challenge. This is because hair isn't just a solid mass; it's made up of many individual strands, yet it also moves and behaves as a single unit. It has a certain flow and a way of catching the light that can be hard to show. Understanding how all these parts work together is a big part of getting hair to look believable, you know.
It's a bit like trying to draw water or clouds; they have a form, but it's not a rigid one. Hair is like that, always moving, always changing a little with the breeze or the way someone turns their head. The way light hits it can make it look shiny or dull, and the way it sits on the head gives it a certain shape. All these small things add up to make it a subject that asks for a bit of thought before you start drawing lines, very much so.
Getting a Handle on Hair Construction
When you begin to figure out how to draw hair, one of the first things to think about is its basic build. Think of hair not as a bunch of tiny lines right away, but more like a larger shape or a kind of helmet that sits on the head. This first step, often called construction, means you're sketching out the general outline of the hairstyle. It's about getting the big picture right before you worry about the smaller bits. This helps you get the right amount of fullness and where the hair generally sits on the head, which is pretty important.
- Computers Of The 1980s
- How Many Feet Is A King Size Bed
- Scarswonderland Lekas
- Lil Tecca Net Worth
- Who Owns Gamersupps
For example, if you are working on a female character, you might first sketch a large, flowing shape that suggests long hair, or a more compact shape for a shorter style. This early shape helps you make sure the hair looks like it has real bulk and isn't just flat against the head. It's a way to plan out the overall look, giving you a solid base to work from. This method helps a lot with making sure the hair has a good sense of being three-dimensional, too it's almost like building a simple form before adding all the details.
How Can You Make Hair Look Real?
Making hair appear as if it could really be there, like you could almost reach out and touch it, involves more than just drawing lines. It's about giving it life, showing its depth, and letting light play across it in a convincing way. This means thinking about how light and dark areas work together, how different parts of the hair catch the light, and how other parts fall into shadow. When you do this, the hair stops looking flat and starts to seem like it has actual weight and form, which is pretty neat.
You can use different shading approaches to show how light hits the hair. For example, some areas might be quite bright, showing where the light source is hitting directly, while other parts will be much darker, tucked away from the light. This contrast between light and dark helps to give the hair a rounded, full look. It's a way of making it pop off the page, giving it a sense of being real and having a bit of volume to it, too.
Adding Shape and Fullness to How to Draw Hair
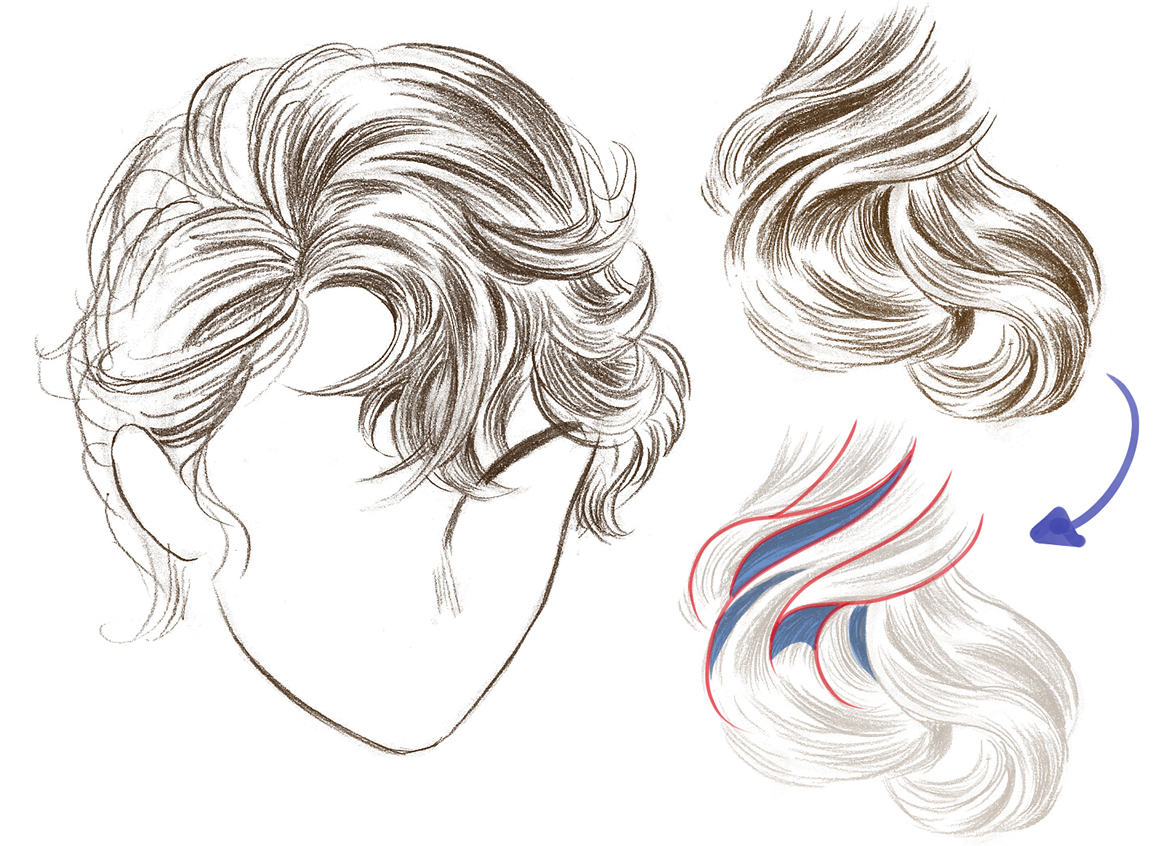
After you have that first general outline, the next step in how to draw hair is to give it more specific form and a sense of being full. This means thinking about how the hair flows and clumps together, rather than focusing on every single strand. You can think of the hair as having larger sections, almost like ribbons or big waves, that move together. This approach helps to show the natural direction and movement of the hair, giving it a much more believable feel.
When you are adding shape, consider how the hair might curve around the head or fall over the shoulders. You can use a method where you "block in" these larger shapes, filling them with a general tone before you add finer lines. This helps to create the impression of bulk and makes the hair look like it has weight. It’s a good way to make sure the hair doesn't look like it's just painted on, but rather like it has a natural body and presence, which is quite important for realism.
Are There Simple Ways to Draw Different Hair Types?
Yes, absolutely! There are some simple yet effective ways to approach different kinds of hair, whether it's long and straight, short and neat, or full of waves and curls. The trick often lies in not getting lost in every single detail, but rather in finding the general pattern or feel of that particular hair type. Once you understand the basic idea of how a certain hair type behaves, it becomes much simpler to put it down on paper, that is for sure.
For instance, wavy hair has a different kind of movement than straight hair, and curly hair has its own unique bounce. By using some basic methods, you can suggest these differences without having to draw every individual curl or wave. This means you can get a good representation of various hairstyles, from a flowing mane to a closely cropped look, without spending ages on tiny details. It makes the whole process much more approachable, too.
Quick Methods for How to Draw Hair Styles
Let's look at some quick methods for how to draw hair, covering a few common styles. For long, straight hair, you might focus on long, smooth lines that follow the direction of the hair, keeping them relatively parallel. This helps show its sleekness. For shorter hair, you'd think about the overall shape it makes around the head and how it might stick out or lie flat in different areas. It's about capturing the general outline and flow, very much so.
When it comes to wavy hair, you can use gentle, curving lines that repeat, giving the impression of soft undulations. And for hair with a lot of curl, like an afro style, you can use a technique where you make many continuous, small circular shapes to build up the overall mass. This helps give it that full, textured appearance without needing to draw each individual curl. For really messy curly hair, like some specific styles, focusing on these larger circular forms with a softer pencil, like a 4B, can help avoid getting caught up in tiny details that might make it look too busy, you know.
These methods can be applied to both male and female characters, helping you create a range of looks. Whether you're aiming for a neat, short cut or a wild, flowing style, these basic ideas can guide your hand. You can even try out three different female hairstyle variations, following step-by-step examples with just pencil and paper, to see how these ideas play out in practice. It's all about finding what works best for the kind of hair you want to show, really.
How Do I Practice Drawing Hair?
Practicing how to draw hair is a lot like practicing any other skill; the more you do it, the better you become. It's about trying out the different approaches and seeing what happens on your page. Don't be afraid to experiment with your pencil or digital brush, trying out different line weights and shading methods. Each time you put your ideas down, you're learning something new about how hair behaves and how you can best show that in your pictures, that is for sure.
A good way to practice is to break down the process into smaller, more manageable steps. Instead of trying to draw a whole head of perfect hair all at once, focus on one part, like getting the overall shape right, or practicing how to make it look full. Then, move on to adding light and shadow, or trying out different textures. This way, you build your abilities bit by bit, and each small success helps you feel more confident about the next part, which is pretty helpful.
Using References to Improve How to Draw Hair
One of the most helpful things you can do to get better at how to draw hair is to use references. This means looking at real hair, either from a picture you print out or from an image on your phone or tablet. Seeing how hair actually looks in different lights and on different people can give you so many ideas and help you understand its forms. You can see how light falls on it, how it clumps together, and how different styles sit on the head, very much so.
When you use a reference, you're not trying to copy it exactly line for line. Instead, you're observing. You're trying to figure out what makes that hair look the way it does. For example, if you're looking at a picture of curly hair, you might notice how the curls form larger groups, or how certain parts are darker because they're in shadow. This kind of close looking helps you to understand the underlying structure, which you can then use in your own drawings, too.
Working with references is also a great way to improve your general ability to draw profiles. Hair styles often define the outline of a person's head, so practicing how to draw hair helps you get better at seeing and drawing those overall head shapes. As you work through the steps, from basic shapes to adding shading, you'll also pick up general skills for making hair look real with your drawing tools, whether that's a pencil or a pen. This means your practice time is doing double duty, helping you with more than just hair, you know.
What About Specific Hair Challenges?
Sometimes, certain hair types can feel like a bigger puzzle than others. Hair that has a lot of curl or a particular texture, for instance, might seem a bit more difficult to capture at first glance. But even these styles have their own simple ways of being approached. It's about finding the right technique that works for that specific kind of hair, rather than trying to force a general method onto something that needs a slightly different touch, that is for sure.
Understanding the common difficulties with certain hair types can help you prepare. For example, hair that has a lot of volume or a very distinct curl pattern might need a different starting point than hair that is sleek and straight. By knowing what to look for and what methods work best, you can tackle these challenges with more assurance and get good results, pretty much every time.
Tackling Curly and Coiled How to Draw Hair
Curly and coiled hair can seem quite busy and a little hard to draw if you focus too much on every single strand. The secret to how to draw hair with lots of curl is to think of it in terms of larger, softer shapes rather than tiny, individual details. As mentioned earlier, using continuous circular motions with your pencil can help build up the overall mass and texture of the hair, especially for a full, bouncy look. This helps create the impression of many curls without you having to draw each one perfectly, which is a real time-saver.
For hair that is very coiled, you might think about how the coils stack or layer, creating a distinct pattern. Again, it’s about simplifying what you see into more manageable shapes. You can block in the general areas where the coils sit, then add hints of the individual twists and turns. This way, you get the feeling of texture and volume without getting lost in too much detail. It's a method that helps make even the most intricate hair styles feel approachable, you know.
Learning to Shade Hair with Confidence
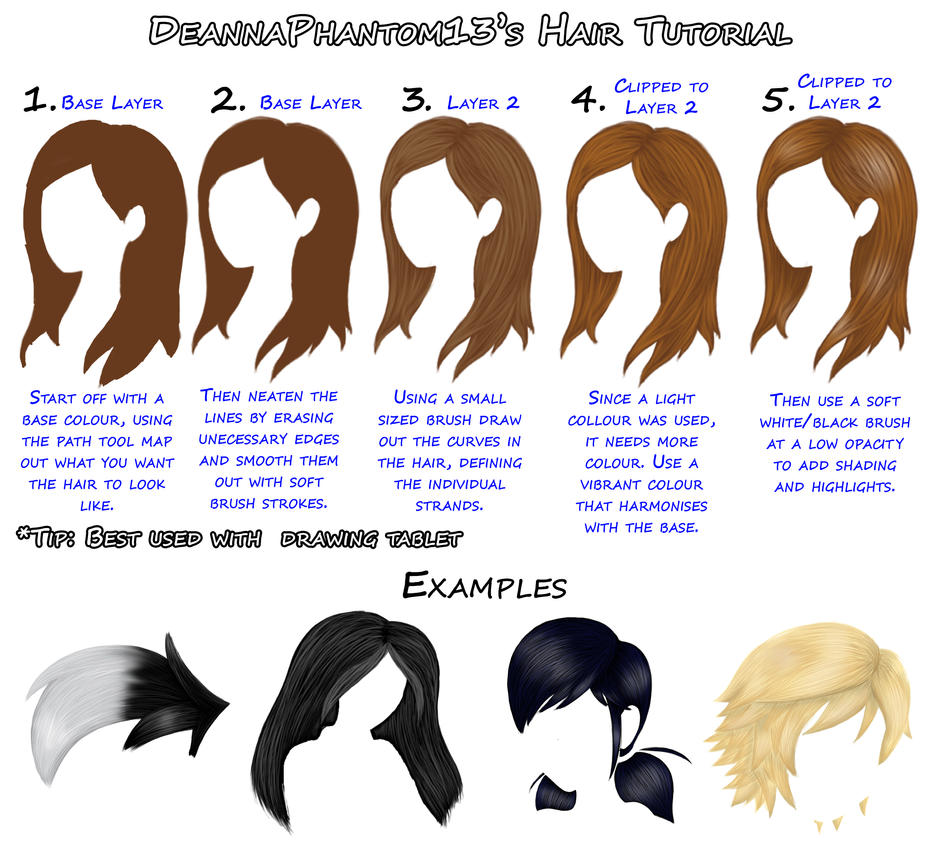
Shading is where hair truly comes to life, giving it depth and a realistic feel. Once you have the basic shapes and construction down, adding light and shadow helps to show the hair's volume and how it curves. Think about where your light source is coming from; this will tell you which parts of the hair will be bright and which will be in shadow. The contrast between these areas is what makes the hair look rounded and real, really.
You can use different levels of darkness to show the hair's form. Areas that are closer to the light will be lighter, while areas that recede or are underneath other clumps of hair will be darker. This creates a sense of three-dimensionality. For example, using a softer pencil for the darker areas can help create a smooth transition. This practice of shading also helps to develop your general skill in putting down tones with your pen or pencil, making your overall drawing abilities stronger, too. It’s a good way to give your hair drawings that final bit of polish, making them look truly believable.
This guide has walked through many simple ways to approach how to draw hair, from getting the basic structure right to adding fullness and showing different styles. We looked at how to use simple shapes for construction, how light and shadow bring hair to life, and quick methods for various hair types like straight, wavy, curly, and short. The importance of using references to improve your skill and how to tackle specific challenges like coiled hair was also covered, giving you a good set of ideas to help you draw hair with more assurance.
Related Resources:

Detail Author:
- Name : Mr. Merritt Abshire
- Username : mueller.joany
- Email : maia94@hermann.com
- Birthdate : 1971-04-01
- Address : 9751 Maritza Street Apt. 823 Antoinettebury, WI 21958-4280
- Phone : 1-678-826-2854
- Company : Willms-Larson
- Job : Industrial Engineer
- Bio : Sit tempore nihil et et. Sed ad modi et dicta praesentium. Facilis et debitis perferendis eveniet. Hic mollitia error iste unde voluptatem atque dolor.
Socials
facebook:
- url : https://facebook.com/isadore.walker
- username : isadore.walker
- bio : Quas non enim doloremque omnis.
- followers : 2090
- following : 2933
linkedin:
- url : https://linkedin.com/in/walker1977
- username : walker1977
- bio : Incidunt aut nihil occaecati voluptas ab cum.
- followers : 3345
- following : 2704

